Wednesday, September 6, 2017

My Personal Thread Challenge


I decided to take a small break from quilting on Saturday to catch up on a few QAL blocks I'm behind on.  I started with Cindy at Stitchin At Home's Churn Dash block for the Medallion Quilt.  I have to admit Churn Dash is on my list of favorite blocks.  Simple to make and a fun block to quilt all on its own. 

So far all the blocks I've made have had a green and purple color scheme.  I went out on a limb and decided to add black to the mix.  It may seem like a strange choice at the moment, but I think it will make more sense once the quilt completely comes together.  The main fabric I'm using for a border, does have black in it.  Fingers crossed it will all work out.


Next up was catching up on the latest two blocks for the Aurifil Designer BOM quilt.  This year each designer has been assigned a color as we work our way around the color wheel.  I think it isn't much of a secret how much I love Aurifil thread.  I don't even come close to having all the 270 colors in their collection, but what is my color range as far as the color wheel goes?

So, for fun, I snapped a few pictures of the blocks to date and spools from my personal stash.


Our journey around the color wheel started in January with the color blue and Janet Clare's Cat Block.  I think these spools of Aurifil 1126 Blue Grey and 2775 Steel blue will look wonderful when I'm quilting up this block.


February brought us designer Maureen Cracknell and her Dutch Treat block in blue-purple and for me a lovely spool of  2510 Light Lilac.


Let's skip to April, the color purple and Sue Marsh's New Direction Block.  I accidently made the March block using April's colors, red purple.  This was my first time working with triangles, but not that spool of 1240 Very Dark Eggplant.  That spool and I are very well acquainted. 
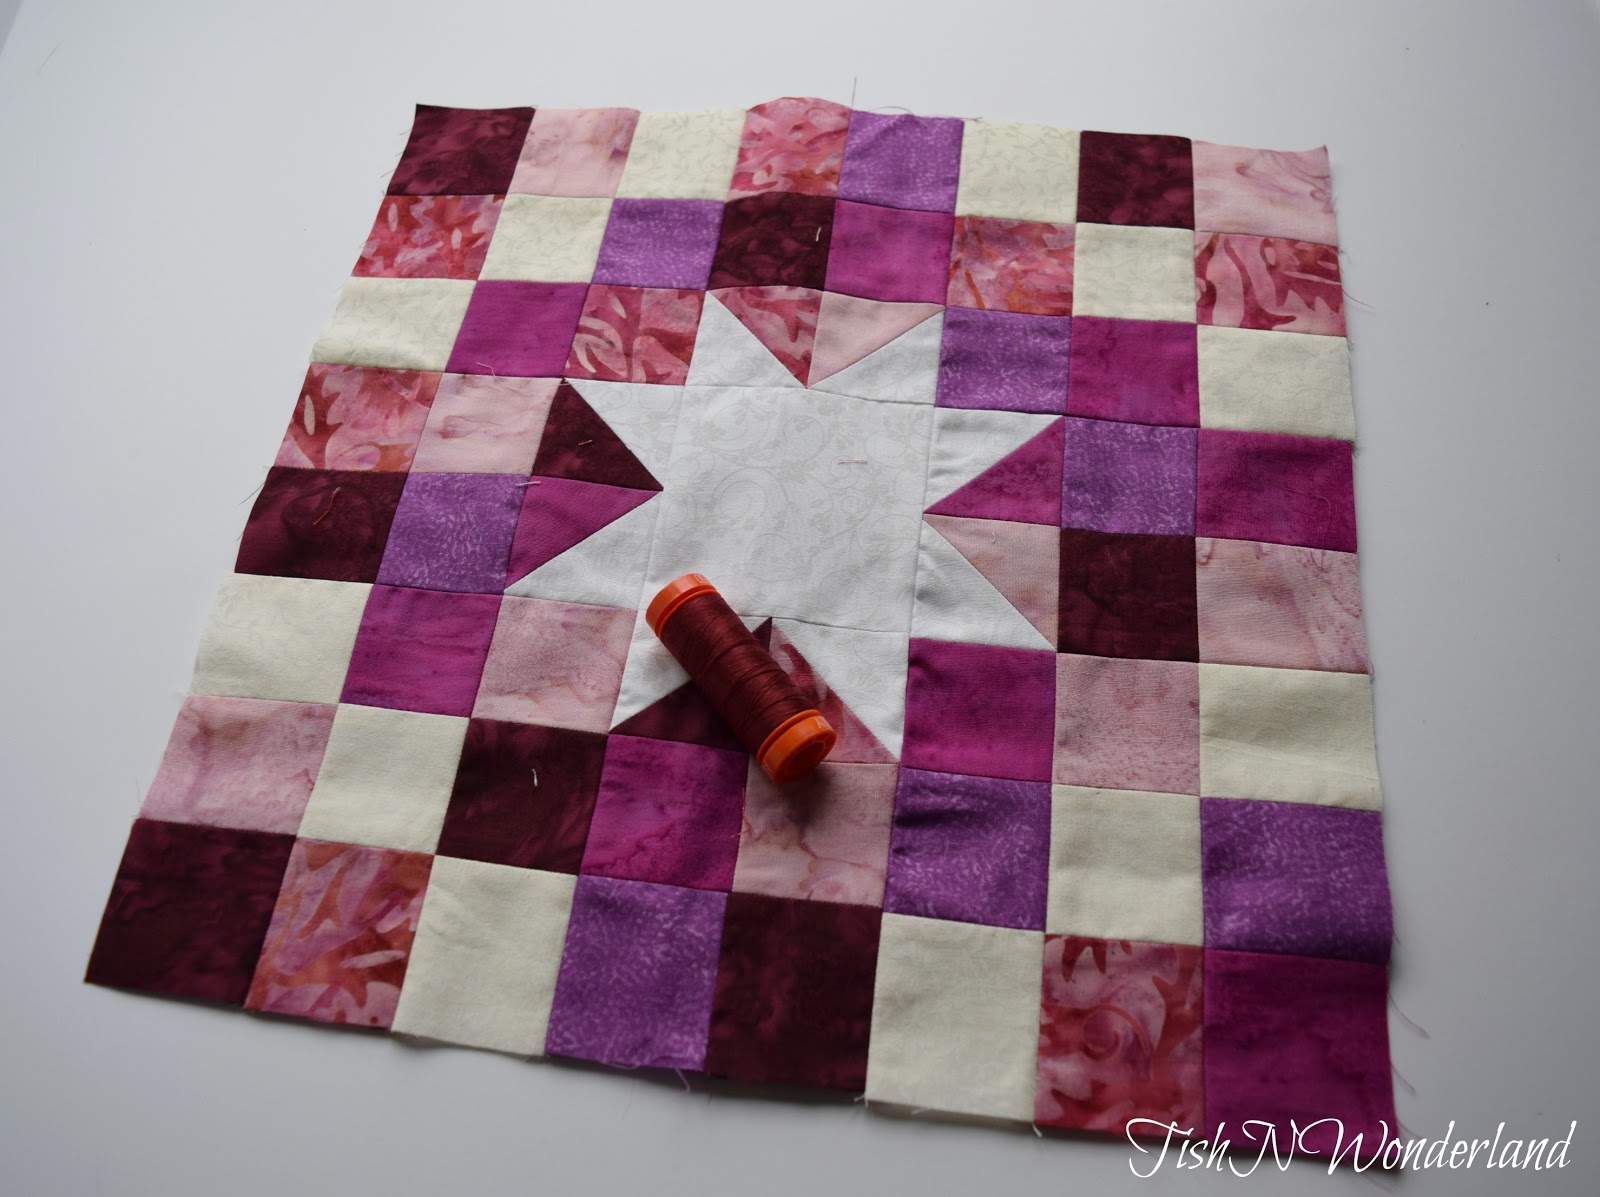

March gave us Melissa Corry, Scraptastic Stars, and the start of my color confusion.  A happy accident I'm glad I made.   I love it in these shades of red purple better, especially paired with this spool of 2460 Dark Carmine Red.  Hmm...I may need a larger spool.


Mister Domestic, Matthew Boudreaux, shared his Faux Weave block in shades of brilliant red with us.  When I think red, I immediately think 2250 Christmas Red.  Don't let the fullness of this spool fool you, it's a replacement for an almost empty one.


June kept things rolling with Sarah Maxwell and her block Star Shine in shades of red orange and my spool of 5002 Medium Red.


July is where I fell behind...applique.  Shruti Dandekar shared with us the instructions to make her beautiful Reverse Applique block in orange.  I still struggle with applique.  I decided to do reverse reverse applique, meaning regular applique.  However, after purchasing new sharp scissors (just to be used for applique), I wish I had used Shruti's method of making the block.  Live and learn.  I used this spool of 2235 Orange to satin stitch around the applique.


And completely catching me up (until the 15th that is) is Brenda Ratliff's Bright Sun block in orange yellow and spools of 2214 Golden Honey and 2330 Light Chestnut.  It's such a bright happy block. 

Sadly there are only four more designers and blocks to complete our journey around the color wheel.  Wonder if I will have enough spools of thread to complete this journey as well?  Guess we will just have to wait and see.

Also, if you haven't heard the buzz...Aurifil Buzz that is, Aurifil is hosting a mini series on their blog right now about the different types of threads they have available.  Did you know that they actually make four different types of thread and have six different weights of cotton?  Me either.  You can tell from my pictures and the orange spools that I'm in love with their 50wt Egyptian Cotton threads (I like my thread like I like my sheets...Egyptian Cotton).  Part one of the series was released yesterday and you can learn more about their 12wt and 28wt cotton threads.  Check out their post and eye candy here.  I'm thinking next year might be a year of experimentation for me...well with threads anyway.


Other than quilting my little heart out, that's about all that's been going on here.  Since I won't have a quilt finish by Friday, I thought maybe I would write up a quick tutorial for the green and purple baby quilt I finished two weeks ago.  It's a great one for when you need a baby quilt by say...tomorrow.  I think we've all been there before.


Today I'm linking up with Let's Bee Social and Midweek Makers.

Friday, September 1, 2017

Blue Sky Star Blossom


You guessed it, another Star Blossom Quilt.  I just love quilt this pattern.  This version of my and David's quilt was pieced using Laundry Basket Quilts's newest line Blue Sky.  I LOVE these blues.  They make me want to have a picnic, hug my grandma and eat apple pie while setting in a tree swing.  A longing nostalgia for my childhood and simpler times...but I digress.

For this 38" version of the quilt, I traded in my straight line dot to dot quilting for some fun continuous curves.  My thread choice this time around was a wonderful spool of blue and beige; Aurifil #2775 Steel Blue and #2310 Light Beige.  The Light Beige played wonderfully across the center of the quilt top.  It did a perfect job of highlighting my continuous curves in the light and medium blue fabrics, without distracting from those gorgeous prints.


When it came time to do those dark blue borders, I feared there would be too much contrast using the Light Beige.  The second question was how to quilt the borders.  I wanted to do feathers so badly.  There is a feather filler in the center star and I thought they would look fabulous in the borders as well.  Let's face it, feathers can take a bit of work and a whole lot of concentration.  My fear was that ultimately you wouldn't be able to see them very well and that's a lot of time to spend on something that is hidden.  So I went with a classic piano key border.  Quick and easy and didn't distract from those large clusters of flowers in the print.


For the binding I chose this lovely cornflower blue stripped print from the Blue Sky collection.  I love how those stripes frame the quilt and the blue gives a nice pop.


Nothing better than a finished quilt.


In honor of the long weekend for Labor Day (and celebrating three days off from work with quilting in the forecast) I've decided to run a sale on Star Blossom in my Craftsy Store from today until Monday at midnight EST.  Star Blossom pattern is available in four sizes (baby, throw, full and queen).  So if you are looking for a quick and easy project to tackle over the weekend, hop on over to my Craftsy Store and check out Star Blossom.


Wednesday, August 30, 2017

Lot's of Prepping Going On


Remember this picture?  Yeah, me either.  I've conveniently allowed myself to completely forget about it.  This collage of quilt tops, was my declaration at the beginning of the year to bust through my stack of quilt tops and see the year end with a stack of finished quilts.  It's now almost September and I haven't touched a single one.  On top of that, David and I both have created several more tops that need quilted.  I swear, quilt tops are like rabbits, they multiply at an alarming rate.

It's time to regroup, get my head back in the game and quilt like a mad woman.  So where do I start?  Most of these quilts are rather on the big side, so I didn't really want to drag out my Plexiglas and battle my animals for floor space.  My alternative?  Recreate the quilts in EQ7 to make print outs that I could draw on.   

So why would I recreate the quilt in EQ7 if I already have the pattern?  Recreating a quilt you've already made and have a pattern for in EQ7 is actually a great way to practice using the program.  I've been struggling with trying to figure out how to create asymmetrical layouts or even layouts where the sashings are pieced and part of the design (not just mini borders).  Doing this has helped me learn about the program and how to use different features and functions. 

**I want to be very very clear here.  I'm not talking about seeing something on Pinterest or another blog and trying to recreate it for my own use or share it with someone else (both big No No's).  I'm talking about patterns I have either A) purchased, B) it's free for all to use, C) I own the magazine or book it was published in or D) been gifted the pattern by the creator.  I'm just trying to learn how to better use the program and create a graphic image that I can map my quilting design on.  I've also used it as a way to audition fabrics for quilts before I actually purchase fabric online.**

Decisions need to be made to either custom quilt the tops or simply quilt it with an all over design.  I have several quilts in a stack that I know I want to quilt with straight lines, wavy lines or some sort of all over filler.  First on that list is my recently pieced Have a Jolly Christmas Quilt from Lorna at Sew Fresh Quilts recent QAL.  I have backing and batting and hope to load it on the long arm at my cousin's house this week and practice with some wavy lines.

As for some of the more custom quilt jobs...expect to see lots of dot to dot designs that incorporate using quilting rulers.  I love designs that require very little marking.

This is a quilt made from a kit I purchased some years ago. 


These are mark ups for David's Star Blossom Quilt made from Kona Solids.  I really want to do some crazy quilting in this one, so I've tried several different things...as you can see.


I can't wait to explore some fun ruler work inside the stars of the Midnight Mystery Quilt, pattern by Cheryl at Meadow Mist Designs.

 Speaking of Cheryl's Quilts...


Last night, I was able to start quilting on a recent Meadow Mystery Quilt that David pieced.  This is our second commissioned quilt.  Though technically it's the first, because we were contacted about it before the baby quilt...the baby quilt was just quicker to make.  I was impressed and feeling pretty good about how quickly this quilted up using my Handi Quilter quilting ruler.  No marking what so ever.  Then the curse of the Meadow Mystery quilt struck again!


After I finished this corner and flipped it over to check out the stitching on the back, I discovered a small scrap of fabric from Jenny's birthday quilt had stuck to the back of the quilt.  Seriously???  Why??  I have to admit the profanities didn't fly from my mouth like they did when it happened to this quilt...


just the laugh of a crazy quilter.  Hopefully, this will not become a trend with this quilt.  I still have two more Meadow Mysteries to quilt.

So for now, it's back to sneaking in time on Jen's quilt, quilting on this one (ignoring the mistake on the back till I feel like fixing it, it's not going anywhere) and continuing to map out plans for the other quilts.  I hope you will come back for a visit on Friday to see my latest quilt finish.


Today I'm linking up with Let's Bee Social.

Thursday, August 24, 2017

Commissioned Baby Quilt


This quilt marks a first for me, being commissioned to make a quilt.  Although technically, David was commissioned to make this quilt, it instantly became a team work project.  Just like we use to have Brangelina (well before the divorce), Julie at Pink Doxies has coined us to be "Dish (Dave +Tish).  So Dish was commissioned to make this quilt.

From the get go, I wasn't sure about taking on the project.  I have never made a quilt for money.  All of my creations to date have been for the pleasure of creating or were made to be gifts.  I have never figured out a good way to put a price on what we do.  That all changed the evening David texted me from work to let me know that he agreed to give a gentleman that contacted him a price on making a baby quilt.  Followed by, how much would it be?

After a deep breath (go figure, my crystal ball was broken) I bombarded David with a boat load of questions.  Does he have a pattern in mind?  What colors in fabrics?  Size?  Lots of quilting or keep it simple?  Time frame?  Basically, what I got back was, colors dark purples and dark greens, smaller in size and keep it around $100...helpful but not helpful.

Using EQ7 I came up with three simple mock ups, a four patch and two different bar quilts.


One thing I love about this program is it easily gives you the fabric yardage needed for a quilt.  This allowed me to create a spread sheet in Excel, to calculate a rough estimate on what it would cost to construct the quilt.  I included things such as; fabric to make the top, backing, batting, binding fabric, and a thread usage charge.  Then came the hardest part, labor.  For any of these quilts, piecing and a simple all over quilting, shouldn't take too long.  The size ranged from 30" to 40" depending on the quilt.  So I estimated, 2.5 hours on prepping and piecing, 2.5 hours on quilting and 0.5 hours on binding.  I only set our hourly rate at $10/hr since this would be a fairly simple project.  This kept everything right at the $100 mark, give or take a few dollars.

After the dust settled, our customer decided on the third quilt, and David suggested we add a light green to the blocks with the dark purple bars.


The customer loved the idea and so we ran with it.  I went to our local quilt shop during lunch one day to pick out fabrics, praying that David and the customer would like them.  I probably wouldn't have chosen this color pallet myself, so I felt unsure when picking the fabrics.  This is what the shop owner and I landed on.  I forgot to ask if it was a boy or girl quilt...I crossed my fingers flowers would be fine.


Thankfully, this quilt is for a baby girl and the father to be loved the fabrics.  So, last weekend, while I worked on other projects, David went to work cutting and piecing the quilt top together.  We kept track of the time it took for each step of the project, so that in the future we would have a better idea when working up a quote.  The prepping and piecing was estimated to take about 2.5 hours.  In actuality, it took more like 3.5-4 hours...I totally underestimated.  

Together we quickly basted the quilt together, leaving me to figure out the quilting.  I wanted to do a quick custom quilt job on this one so badly.  I even had David make an extra block with the tiny bit left over.


This is what I came up with and I 'll be honest, I just wasn't sold and neither was David.  I decided that a good ol' stippling (I've finally made peace with this filler) would be perfect for this quilt, so I ran with it.  

I pulled out my thread containers to decide what to use.  I could have sworn I had a spool of an Aurifil purple variegated thread, but sadly I couldn't find it if I did. Maybe I've reached a point I should catalogue my thread colors...is that too nerdy??


For the quilting I decided on Aurifil #2510 Light Lilac.  I love how it melts into the lovely lilac fabric that backs this quilt and disappears into the lighter sections of the front, but pops out for a bit of fun on the darker fabrics.  Because this quilt will be used and washed a quite few times in it's life, I chose to machine bind the quilt.  In my experience, it just holds up better.  I sewed the binding to the front, then folded it over to the back.  Then I clipped it into place and stitched in the ditch from the front.  The Dark Egg Plant blended in nicely when I sewed off the seam line and into the binding fabric, no visible wobbles.


As for the quilting time, I over estimated.  In actuality, it only took me about 45 minuets to quilt this one.  So, what I underestimated in piecing I over estimated in quilting and it came to about the same over all time.  Talk about luck.  I think with time, it will get easier to guesstimate an approximate cost for making a quilt.  I am happy to say that we pretty much came in right at the price I quoted him give or take about $5.00.  


All that is left to do, is give it a good wash with some color catchers to be safe and deliver the quilt.  I hope that it will see lots of warm snuggles, take some wonderful naps, play a few games of peekaboo, catch falling tears and bring comfort and maybe even tuck in a few stuffed animals in a few years.  I will probably never meet the little girl that gets this quilt, but I hope that she knows that it was made with lots of love from two strangers trying to bring beauty and warmth to the world one quilt at a time.


I know for certain this will not be the last commissioned quilt we take on.  David already has a 70" quilt pieced that he was contacted about making, I just need to get it quilted up by October, but we'll talk more about it later.  Until then, Dish will be working away at projects.  Dish.  It cracks me up every time I type it.


Monday, August 21, 2017

Finally-A QAL Finish


School has officially started back in our area and fall it right around the corner.  Though with the hot temperatures and high humidity, you might not believe it.  Last week, quilting wise, ended up being a bust for me.  Not much got finished, with after school meetings and band practices to pick my daughter up from.  It's okay, though, we will eventually slide back into our rhythm and things will return to normal.  Warning: this post may jump around quite a bit...much like my week last week.

One of my main goals last week was to piece together the blocks in Lorna at Sew Fresh Quilt's Have a Jolly Little Christmas Quilt.  I had all my sashing strips cut and little by little each evening the blocks came together.  The finished size of the blocks with sashing was 42"x68", which seemed an odd size to me (very long and skinny), so I decided to add two borders to the quilt.


The addition of the inner and outer borders bring the quilt's size to 58"x84", which should make for a cozy quilt to snuggle under while watching Christmas movies.

You might remember that I'm working on a secret birthday project for my daughter, using one of Lorna's newest patterns.  I can only work on the project on Tuesdays and Thursdays for about an hour while my daughter is at after school band practice. It's coming along slowly, but the center is almost complete.  I've deiced I would also like to make it bigger by adding a fun border.


So this weekend, David and I traveled to Classic Quilt Shop in Clarksburg, WV for a little family fabric shopping.  We absolutely love visiting this store and chatting with Janet, the owner.  I was able to pick up a beautiful rainbow of fabrics that will become a fun border on Jen's quilt and a really cool binding fabric that looks like a clear starry night.  I can't wait to cut in to these pretties.

Next up is the guild block exchange.  In November, those of us participating, will bring sets of five of the Spinning Friendship Block.  I think I will do 7 sets of 5 blocks which will give me a total of 35 to work with in a quilt top.  I am sewing my block pieces as leader/enders while I piece together other projects.  This method is working well for me.  I've already whipped up two sets of five.


Recently, David and I have had a few people ask if they could commission us to make a quilt.  I'll be honest, I'm not necessarily crazy about the idea.  It makes me nervous.  How do you price someone a quilt, without making it first?  Another great question, can you bring their vision to life, if they don't know exactly how to communicate it to you?  Of course, David said yes to them.  The first quilt will be a larger one (it's actually pieced and waiting for me to quilt it) and he agreed to the commitment before a price was settled on.  The second was for a baby quilt.  The person really had no preference other than he wanted dark greens and purples and could we keep it around $100.  So I created a spread sheet to estimate cost and mocked up a few designs for him to choose from.


This weekend, we were able to complete the small quilt from start to finish.  I will share more about his later this week and how I landed on a price.  So I'm curious,  do you make quilts for others and how do you settle on a price?  Do you have any tips on how to make the whole process smoother?

Well, that basically wraps up the doings for me over the past week.  I look forward to all the quilty goodness this week brings and wish everyone a super creative week.  And remind you...


be good...Santa is always watching.


Today I'm linking up with Main Crush Monday and Let's Bee Social.

Thursday, August 10, 2017

Back to QAL Work We Go


Time for a bit of a project update and what I've been up to.  I have a ton going on at work, leading a system conversion from a very archaic computer system to a much better Window based platform, so when I get home in the evenings and weekends, I'm ready to unwind and not think about work.

Above is a look at my cut pieces for the Magnolia Mystery Quilt going on now over at Meadow Mist Designs.  If you have not participated in one of Cheryl's mystery quilt alongs before, I HIGHLY encourage you to hop over there and check it out.

It's been a week or two since I have caught up on the QAL's I'm participating in, so this past week was spent mainly catching up on those.


Oh, deer, just look at that moose under the mistletoe!  The moose and deer blocks caught me up on Lorna at Sew Fresh Quilt's Have A Jolly Little Christmas Quilt.  I just realized as I'm typing this, the last block will be given to us this weekend.  Could we have a quilt finish before Christmas 2017???  I think we just might.


Next up, was the The Double Star Block in Cindy at Stitchin At Home's Medallion Quilt BOM.  I am really loving me some purple and green with this quilt.


Goodnight Moon is the next block in Pat Sloan's The Children's Library BOM.  Only two more to go and this extremely fun QAL will be coming to an end as well.  I had hoped to finish up the Aurifil BOM and show you as well, but we are not currently on speaking terms at the moment.  It is packed full of applique and at the moment, my head just isn't in that game.

Taking a break from the piecing scene, David and I borrowed my mom's garage for a basting quilt session.


We were able to baste four smaller quilts, all currently waiting for me to pick them up and quilt them.


Here is a picture of David and his Poodle Quilt.  While scrolling through Instagram, he ran across Sue at Seven Oak Street Quilt's Poodle block she made for hive queen Karen at Tu-Na Quilts.  Loving all things of the 50's; 57 Chevys, girls in poodle skirts, you get my drift.  He decided to super size the block, change the piecing up a bit and create his own throw back to the 50's with some recent fabric purchases.  I'm thinking that negative space is screaming for some fun flow quilting.  What do you think?

Even after all that was finished last weekend, I snuck in some cutting time, to cut out a quilt for my daughter's 17th birthday.  I'm pretty sure she doesn't read my blog, but just incase she does, I won't let the cat out of the bag quite yet on what it is, but it is another one of Lorna's wonderful creations.  Do I have a Sew Fresh Quilts pattern obsession?  Hmmm?

I think I have confessed before, I'm a cluttered mess.  I'm an OCD person's nightmare...ask David.  However, there comes a point about every 3-6 months I can't take it anymore; the stash starts stacking up (from growth or laziness), the sewing space becomes cluttered...I have to clean it up.

So in keeping it real here on the blog (because I keep telling myself I'm not the only one who is like this), I pulled out my fabric totes to "file" the fabrics in there correct bins.


It became clear pretty quick like, that the fabric wasn't going to fit in their respective bins.  AHHHHH.


But Caroline tried to convince me everything was okay, because she fit in this newly almost empty bin...sigh.

So after several go rounds in my head I opted to purchase three more fabric bins and do the fabric shuffle.  My whites, blues and reds are in the biggest of the totes (how patriotic of me) and everything else fell in line.  So the stash is back under control and arranged in the back room.  The cats, bless their hearts, love fabric shuffle time, because the living room is transformed into a kitten playground.


I am feeling more grounded now and believe I can create once again.  I've come to the realization that with two serious quilters in the house, something must be done.  Quilting has taken over the house.  If that sounds like a daydream, trust me it's not.  There is talk about converting our porch into a sunroom/quilting room.  I do love my porch, however, we don't use it.  Why?  Because I'm inside quilting!  This would allow us to have a dedicated room for quilting and let the dinning room be a dinning room (since I'm now cooking again, thank you Instant Pot), the spare bedroom be a bedroom and the breakfast nook be...well something other than home to my Sweet Sixteen.  But, we shall see.  A girl can always dream


Related Posts Plugin for WordPress, Blogger...